How to build a RAG pipeline without skipping evaluation
By Abdul Asim ·
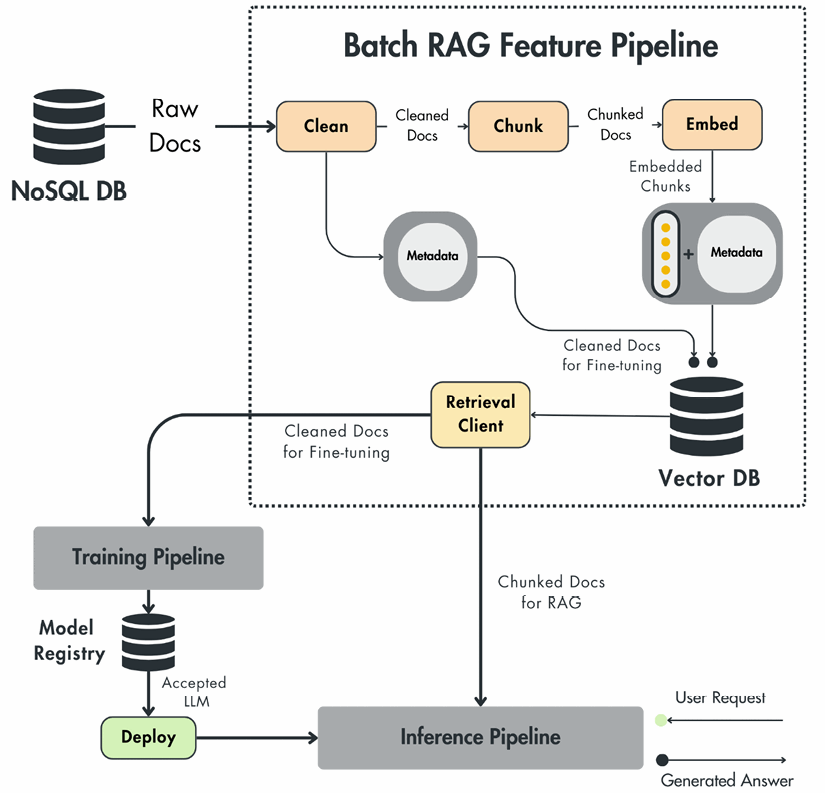
Overview
Building a RAG pipeline means building the ingestion side first and the question-answering side second, then measuring the result. The steps below follow a common production approach: a RAG feature pipeline populates a Qdrant vector database and a separate inference pipeline retrieves from it. Start with the simplest version of each step and add advanced techniques only when your measurements show a need.
Step 1: Decide what the system must answer
Write down the questions users will ask and the sources that contain the answers. This defines your data, your freshness needs and how you will judge success. A support bot needs help articles updated daily. A research assistant may need a static archive.
Step 2: Collect and clean the data
Pull documents from their sources into one place. A typical design collects raw data into a MongoDB data warehouse with an ETL process first, then cleans it as part of the RAG pipeline. Remove invalid characters, normalise formatting and keep useful metadata such as source URL, author and date.
Step 3: Chunk the documents
Split each document into pieces small enough for your embedding model and focused on one idea. Start with a sensible size and some overlap, then tune it by looking at retrieval results. Store the surrounding text or metadata so you can supply wider context to the model later if needed.
Step 4: Embed and store
Choose an embedding model, embed every chunk and load the vectors with their metadata into a vector database. Run this as a scheduled batch job so the database stays in sync with your sources. Batch is often chosen over streaming because it is simpler to build and maintain when second-by-second freshness is not required.
Step 5: Build retrieval
At question time, clean and embed the query with exactly the same steps as in ingestion, then search for the top K similar chunks. Begin with filtered vector search or hybrid search, since they are quick to implement. If the results are weak, consider query expansion, self-querying to extract filters, or fine-tuning the embedding model.
Step 6: Add re-ranking
Retrieve more candidates than you need, then use a cross-encoder to score them against the question and keep the top few. This usually improves precision and keeps the prompt short, which also lowers cost and avoids distracting the model with noise.
Step 7: Write the prompt and call the model
Build a prompt template that tells the model to answer only from the supplied context and to say when it does not know. Insert the retrieved chunks and the question, send the prompt to your language model and return the answer, ideally with the sources. Version your templates.
Step 8: Evaluate and deploy
Test the whole system, not just the model. For RAG systems you must evaluate new parts such as retrievers and post-processors too. Check whether the right chunks are retrieved and whether the answers stay faithful to them. Then deploy the ingestion job and the inference service separately, and monitor both.
See it in a real build
For a production view of where RAG fails after launch—and how to fix it—read Production RAG pipelines: where they fail and how to fix them. For shipped systems on this site, start with the AI Sales Agent (edtech purchase advisor) and other selected work under Projects.
For the concepts behind each step, read our guides on how a RAG pipeline works and on the components of a RAG pipeline.